

This guide was prepared by one of our local contractors in response to questions posed by clients over several years. It reflects his opinions and experience, and was applicable at the time prepared. We believe that much of the information presented can be useful to anyone contemplating construction of a custom home and offer it for your use (with the author’s permission).
Table of Contents
- Introduction
- Building Sites
- Plans & Specifications
- Permits & Fees
- Selecting a Contractor
- Types of Contracts
- Sample Contract (PDF)
- Typical Schedule
- Sample Schedules (PDF)
- Costs & Cost Factors
- Sample Cost Breakdown (PDF)
- Changes & Problems
- Sample Change Order (PDF)
- Mechanic’s Liens
- Information from Your Builder
- Project Financial Summary (PDF)
- Sample Invoice (PDF)
- After Final Inspection
- Financing
- Glossary of Construction Speak
Copyright © 1998, 2005, 2006, 2008, 2012
Introduction
The intent of this booklet is to provide information that will assist you during the process of design and construction of your new home.
Committing yourself to a design that will serve your needs, satisfy your aesthetic requirements, and fall within your budget is a challenge. But, It need not be a time of stress, on the contrary, working with your Contractor/Designer can be a creative, productive, harmonious process.
What follows are descriptions of what drives the cost of construction up, some suggestions on what to avoid, the procedures one must follow before construction begins, and the stages of construction from earliest conception through the builder’s responsibilities after final inspection. All will hopefully help you understand what to expect, and increase the chances that you will enjoy the creation of a new home that is uniquely yours.
The material provided here reflects my knowledge, experience and professional standards. While your selected contractor should have a sound understanding of design and superior construction skills, I believe that responsibly executed specifications, contracts, change orders and other sound business practices are equally as important. These issues are discussed in the following sections.
Why should you build the home of your dreams? This is not a foolish question, since an existing structure is easier to appreciate (or dislike) than one still on paper or in the conceptual stage. However, available homes may not exactly fit your personal requirements, architectural style or desired location.
Northern California’s growth in housing costs per square foot is considerably less than most areas. Although material prices have gone up, a depressed economy has kept the pressure on labor costs in this area. Existing home values may be currently depressed but the market is beginning to recover. When people compare old to new, the major differences will be in energy efficiency and the amenities today’s buyer wants. Design and construction does take time, however. The section on Schedules will provide some information of the time scale for typical single family home projects.
In summary, building your new home may not be more expensive than buying someone else’s. It can be a fulfilling experience, and will result in something unique that has been created with your participation and contribution.
Building Sites
The selection of a building site and the design of a home are inextricably related. A structure should not be designed until we know the site, and a site should not be selected until you have a good idea of your house configuration. In some cases the owner has purchased the property, and the designer’s challenge will be to create a structure that will satisfy the owner while also being in harmony with the site. In other cases the owner has a particular design in mind and the challenge is to find a site that is suitable. A reputable contractor should be willing to provide advice and counsel in site selection.
Site characteristics can have a dramatic impact on construction costs. Often lower land price is more than offset by increased utility service and building costs. For example:
Water: Water is everywhere unless there isn’t any on your property at a reasonable depth. Wells in the Mount Shasta area range from 80 to 200 feet (although there are some 400+ examples also). At approximately $30 – 40 per foot plus pump, tank, lines and electrical components, budgeting $6000 to 8000 for water is not unrealistic. Compare this to a $200 hookup fee to a public water system and you can see the impact on the project costs. If your selected property does not have a proven source for water I recommend that your purchase offer be contingent on you being able to drill a producing well of no greater than 200 feet depth. I believe it is better to invest in the drilling than to end up with a $100,000 plus investment in a dry piece of land. Although only a minor amount of water is required during construction, it is prudent to know that water is actually available before committing the funds for construction. In fact, in most cases, the County will not issue a building permit until the well has been drilled and the water availability proven.
Sewage disposal: As in the case of obtaining a suitable water source, finding a suitable location for sewage disposal can not be assumed to be a given just because an adjacent land owner had no problem. To confirm a suitable location for a waste water disposal field requires a percolation test to be run and witnessed by a member of the County Health Department. Like the well, I recommend that any purchase offer for the land be contingent on finding a suitable waste water disposal site. The cost of these tests is $200-300 and is a good investment. In fact, plans submitted for approval will require that an acceptable site be identified before the plans will be approved. Septic systems usually cost around $3500 to install. This compares to hookup fees of $500 to $2000 for public systems. Local cities in Siskiyou County have recently increased water + sewer connection fees to as much as $22,000.
Electrical service: Although there are a few hardy souls willing to “stay off the grid”, the majority of home owners want the benefits of public electrical service. Unless your chosen home site is a significant distance away from existing power lines, electrical service is not a major cost item. The public utility will provide service for some distance at no charge and will provide additional cable at a reasonable cost for the remaining distance. You will provide ditching for underground service (recommended for anywhere that will be visible from your home) and in some cases. you may be charged for a transformer, usually about $3000.
Access: Driveways cost money especially if they involve steep slopes or high ground water areas.
Slope: Seldom is a building site level. There is, however, a considerable difference in building on a slope of 1-2% and a slope of 10% or greater. As the slope increases, a number of things begin to increase costs. First foundation and excavation costs go up. Next framing costs increase due to added material for pony walls (short walls between the foundation and the first floor). Framing costs increase again for additional labor associated with working off of a sloping surface (ladders can not be used without leveling, scaffolds are more difficult to erect, even walking about the site is less efficient). From my experience, there can be as much as 20% difference in cost of the structure due to the slope of the building site.
Weather: Weather at your selected site will have an impact on construction costs. County and city snow load requirements vary based on location. Heavier snow falls in some areas require 60 pound per square foot roof design loads rather than 40 pounds allowed in other areas. Higher roof loads mean increased framing costs due to increased materials. Some locations within the area may be subjected to high winds and the structure must be designed with this in mind. For example, windows should be selected with wind loads considered and finish roofing selected based on wind damage resistance.
Design requirements: Cities and property owner organizations place specific design requirements that affect project costs. For example, the City of Mount Shasta requires off street parking for two vehicles, one in a covered structure. Lake Shastina on the other hand requires a double garage (fully enclosed with a door).
Plans and Specifications
There are several options available to the owner for obtaining plans for the new home. Plan sets from building designers are advertised in the many home design magazines available at your super market or book store. Although these plans are inexpensive they often require significant changing to comply with local building code requirements. Plot plans (a “map” showing the location of the structures and services on your property) must be submitted along with detail drawings of the structures. I do not recommend purchasing these standard plans. However, the magazine illustrations are a valuable source of ideas for floor plans and exterior styles.
The State of California allows single family homes of less than three stories located in areas of light or no snowfall to be designed by building designers who are not licensed engineers or architects. Unusual structural details may require engineer sign off, and this requirement is enforced by the local Building Department. Some general contractors (myself included) provide design services. Design fees vary, but $1.25 to $2.00 per square foot of floor space is typical. Some contractors will provide drawings only if they are the builder. Each building design submitted to the County or City for a building permit must be accompanied with an analysis which proves the design is in accordance with the State Energy Code. This computer analysis, using one of the State approved computer programs, can be done by the building designer or an energy consultant. The computer analysis allows extensive trade offs to be made between windows, insulation and mechanical systems performance. For residential designs prepared by me, I provide the required energy compliance documentation for submittal to the County or City.
Use of a professional architect is the most expensive method of obtaining house plans. An architect provides additional information in the form of specifications, and offers additional services including bid evaluation and project management. The question is whether these documents and services are needed for your particular project. Fees usually range from 10-20% of the construction cost. All new residences in Californiamust comply with the new California Building Code. As might be expected, the new requirements have increased the cost of construction.
All plans for residences in Dunsmuir, Mount Shasta, McCloud and Weed must be approved by a licensed engineer or architect due to snow load requirements and a soils engineer must approve the design for the specific site. Fees for these services range from $3000 to 15,000.
When working with any designer or architect you should be provided with advice regarding the cost impact of various features of your design. One of my pet peeves with some designers and architects is that they draw up either what they personally like or what the owner has said he likes without providing the realities of the costs of the features being defined. The bids come in and the owner then finds that he has a specification for a Mercedes rather than the Honda he was expecting (and could afford). At that point the owner often blames the Contractor for being too expensive.
Valid cost estimates for a project can only be based on the requirements specified on the drawings and supporting specifications. See the section on Costs and Cost Factors.
Permits and Fees
There are several fees that must be paid to various agencies as a condition of building any structure. For purposes of this discussion it will be assumed that you will be building on a parcel of land already zoned for a residence. The fees associated with your project will be:
Plan review: Counties, cities and property owner associations charge fees for review of your plans. Fees for county or city are usually based on rates defined in the Uniform Building Code and are generally 50-70% of the building permit fees discussed below. Home owner organizations generally charge $100-300 for their review which is in addition to city or county fees.
Septic and well permits: If your project involves a well and/or septic system there will be a small fee for the Health Department to confirm location and percolation.
Building permit: Counties or cities charge for a building permit for every significant structure. Fees are generally based on estimated value of the construction. As an example, a fee of $640 may be charged for the first $100,000 plus $3.50 for each additional $1000 up to $500,000.
School fees: As a result of California Proposition 13, school districts created development fees that are applied to increases in inhabitable space. These fees apply only to the living space, not the garage or other non living areas. Each school district has their own rate. For example, Siskiyou County High School District fees in Mount Shasta were recently $.55 while the Grammar School District was an additional $.80. These rates are applied to the square footage. The exact fees applicable to your project will be determined by the school districts serving your area.
Utility fees: If your property is served by water and or sewer services, there will be connection fees. These depend on the individual organization involved. Some sites also require a surface drainage fee of $100 – 200 for the storm drain system.
Cities and counties require evidence that all applicable fees have been paid before they will issue a building permit.
Selecting a Contractor
Selecting a General Contractor involves evaluation of a number of factors, some technical, some fiscal and some emotional. Let’s examine the issues which should be considered in the selection process:
Technical capability: Your contractor should ask questions regarding clarification of items in the drawings or specifications, and be aware of several options which might satisfy the design requirement. In the end, it will come down to your evaluation of prior projects completed by the contractor, and your discussions with him (or her) regarding your project.
Business capability: I have separated business skills from construction skills because this is an area where serious problems can arise. There are many worthy craftsmen who have become general contractors, but have difficulty with the business and/or paper work side of the process. A smooth running job requires business skills, starting with a definitive contract, through change order documentation, to accounting skills. After reading this booklet you will know what to require of your contractor in terms of project documentation and control procedures.
The emotional factor: Honor your sense of a contractor’s ethics and technical and business skills and your “comfort level” when dealing with him.
The State of California recognizes two arrangements for home construction; Owner/builder and Contractor/builder. In the first case, the owner can do some or all of the work and may hire employees and licensed sub contractors as required. All individuals working on the job must be licensed or be employees of licensed contractors or be employees of the owner. Employees of the owner must be covered with worker’s compensation insurance, and all state and federal employee tax contributions withheld. The state no longer allows “independent unlicensed individuals” to perform construction tasks. Some subcontractors create partnerships with their key employees thereby making the former employees owners of the firm which allows them to be excluded from worker’s compensation insurance requirements. If the State finds that worker’s compensation insurance coverage has not been provided in accordance with the law they will demand payment from the home owner if a general contractor is not used. As in “Nannygate” federal agencies may also become involved if proper withholding and Social Security payments are not made. Many banks or other lenders will require that a general contractor be used for any project larger than a small remodel job. Their reasoning is that they can demand satisfactory job completion by threatening license suspension in the case of a contractor, but have no leverage against the home owner/builder.
When you hire a general contractor, he becomes your agent as defined by commercial law. As your agent, the financial liabilities for materials and services incurred during the performance of the job become yours even if you have disbursed funds to him to cover these liabilities. The example contract provided includes information which clarifies your responsibilities and the section on Mechanics Liens also discusses this subject. I have no first hand knowledge of state or federal actions taken against the owner if it is determined that the general contractor or licensed sub contractors are not in compliance with state and federal law regarding worker’s compensation insurance and/or employee taxes. It is my assumption, however, that based on California’s “deep pockets” approach to social justice, an injured worker might receive a judgment against the home owner if he was not legally covered by worker’s compensation insurance and the contractor was without assets.
State worker’s compensation insurance inspectors audit general and sub contractors at least annually to ensure that workers are covered by compensation insurance and that state withholding and unemployment taxes are paid. Any funds disbursed to an unlicensed individual are assumed to be wages and the contractor is billed for compensation insurance and employee taxes.
If you wish to perform some of the construction work yourself you may be able to reach agreement with your general contractor for such an arrangement. However, you may encounter reluctance on the part of the contractor, who has no way of knowing your skill level, or how long it will take for you to do your job. The impact of this is very serious when a lender is involved as they hold the contractor responsible for completion of the project to code and specification standards, and will not disburse funds until the job is completed to the satisfaction of the inspecting entity (city or county). If you are the cause of unsatisfactory work or delays, the contractor has a serious problem.
In summary, I advise most owners to obtain the services of a general contractor if their project is much more than a garage or storage building for which they intend to do a majority of the work. Siskiyou County in particular is a very competitive market for general contractors and “profits” are often simply wages paid for construction labor provided by the contractor himself. I believe that in most cases, the contractor’s cost is more than offset by his selection of material suppliers and subcontractors. A subcontractor or supplier bidding to a general knows that additional jobs will be available to him if he has the best price and quality. If the home owner is soliciting the bid, the supplier generally assumes that it is unlikely that there will be any future work from the owner.
Types of Contracts
Light construction contracts generally fall into two categories, Fixed Price and Time and Materials. We will discuss each type below:
Fixed Price: As the name implies a fixed price contract has a set price for a defined task such as building a house or a set rate for a task such as so many dollars per foot for a fence. Implicit in such a contract is that the task can be defined in advance of signing a contract in enough detail to minimize change orders or unexpected conditions which would affect the contractor. Remodel work is often not a candidate for fixed price contracting if certain conditions will not be known until some of the demolition is completed. Few custom homes are constructed under pure fixed price contracts. Most often a Fixed Price with Allowances contract is used. In this case the bid is made with certain allowances included which are the contractor’s best estimate for items which will be selected by the owner or conditions that will be determined at a later date. Examples of allowance items are cabinets and counters, floor coverings and appliances. An additional allowance often used is for excavation costs if soil conditions indicate that it is possible that rock will be hit. If an allowance is not provided, the prudent contractor will assume the worst and price accordingly. If the actual cost for allowance items is less than the estimate, the contract value is decreased accordingly, if more, it is increased. The advantage of a pure fixed price contract to the owner is that it is known in advance exactly what the total cost will be. The disadvantage is that every item must be defined in advance, and any changes will require a contract change which will include the expense of making the change. In addition the bid will be based on the worst case scenario, and could be higher than necessary. In practice most owners find that fixed price with allowances is an acceptable arrangement.
Prior to 2003, it was reasonable to expect a contractor to know what the material cost would be for a project that he was bidding. However, 2003 and 4 saw material costs inflating at an unusual rate. For example a sheet of plywood went from $9 to $22 within a few weeks.. That experience taught us all that we needed some way to adjust the fixed price contract for material cost escalation The example contract included in this document now includes an attachment for handling material price changes. It allows for contract price adjustment for changes in the unit cost of material but holds the contractor responsible for his estimated quantities.
Time and materials: Time and material contracts normally have a less definitive description of the scope of work than fixed price contracts. They include a definition of what expense items will be reimbursable and what labor rates will be used. They define the fee that will be paid, in addition to the labor and material cost incurred, as a fixed fee amount or a percentage of the costs. The advantage of this type of contract is that it is easier to administer in that changes in scope do not have to be bid and negotiated Where existing conditions are not clearly understood or when the owner wishes to define his desires on the fly, T&M contracts are the only practical way to operate.
The majority of single family home contracts are Fixed Price with Allowances. However, within that definition there is an important issue, and that is the funds disbursement requirements. Disbursement schedules are generally one of two types, phase disbursements or invoice disbursements.
A phase disbursement schedule requires that a discrete phase of the project be completed (usually confirmed by an inspection by the City or County) before any payment is made to the Contractor. Each phase is assigned a percentage of the total contract value with a retention amount payable 30 days after filing of the notice of completion. If the project moves slowly enough that a phase is not completed by the time supplier’s bills arrive at the general’s office, the general must use his own funds to reimburse his suppliers. Most business people know that there is a cost involved with acting as a short term lender and will price the job accordingly. Large builders with sizable staffs are able to move the job along fast enough to avoid this problem. As banks develop procedures acceptable to their major customers, those banks that deal primarily with large contractors in the more populous areas of the state use the phase payment approach. One of the local banks has recently gone from a five phase schedule to a ten phase schedule to assist contractors with their cash flow.
An invoice disbursement schedule disburses funds as the builder incurs the cost, I.e., as he receives supplier and subcontractor invoices and issues payroll checks. Often the schedule also provides a maximum amount that will be disbursed before a major intermediate inspection point such as enclosure or framing inspection is completed. This system has the advantage that the builder does not have to “bank” the project, and as the detail procedures of this approach usually involve the Lender actually mailing the checks to the owed parties, no diversion of funds by the contractor can occur. At least one local bank realizes the value of this approach. I recommend that any owner financed project use the invoice system. As in the phase payment schedule, a retention, usually 10%, is payable after 30 days have elapsed from filing of the notice of completion. This allows time for any liens to be filed (see section on mechanics liens).
A sample construction contract is included for your review. Contract form may vary from contractor to contractor but I advise that all of the issues addressed in the example be included in any contract you approve.
A Typical Schedule
Although every project is different and a number of factors will affect the project’s progress, a typical single family home schedule is useful to give some perspective as to how long the process may be. In the example shown, it is assumed that the design effort begins in the first week of January and is complete about the time that weather would permit construction to start in April. Our example house takes approximately five and one half months of construction time which is typical for houses in the 1300-1800 square foot range with low to mid range finishing details. The majority of custom homes currently being built are taking nine months at a minimum. A number of things will determine construction time:
- Weather
- Subcontractors availability
- Material availability
- Design complexity
- Finish
Depending on the location of the building site, weather may affect the project’s progress to varying degrees. Heavy rain, high winds or snow in one location may be insignificant in another. Most significant weather delays occur early and late in the season, and may add as much as 2-3 weeks to the schedule.
The general contractor has assessed the quality of the subcontractors (electricians, drywallers, plumbers, painters, etc.) in the area. Although there may be several subs available when they are needed on a specific project, there may be only one or two that the general wishes to use to obtain the quality and price that he wants. During certain periods of the building season the demand for specific subcontractors exceeds their ability to arrive exactly at the optimum time. Most generals prefer to wait a week or more to be able to give the sub a chance to schedule the job.
Occasionally, availability of specific materials causes delays. This is most common with such items as doors, windows or hardware, which because of national or regional demand might, for example, go from three week lead time to six weeks.
The sample schedule assumes that we are building a rather simple structure with common framing techniques. If instead we have a difficult hillside stepped foundation, special shear walls and heavy timber trusses we can expect to spend more time erecting the structural elements of the building.
Both exterior and interior finish work can have a dramatic effect on the project schedule as well as cost. Exterior trim detail, Interior wood paneling, tile and hard wood floors are examples.
Although many decisions regarding the configuration and finish of the home are addressed during the design phase, there are a number of decisions you will be required to make or confirm during the construction phase. Some typical examples are noted below:
- Location of TV and phone jacks — Prior to rough electrical
- Select light fixtures — 30 days prior to finish electrical
- Select plumbing fixtures — 15 days prior to rough plumbing
- Select cabinets — 60 days prior to install cabinets
- Select floor coverings — 60 days prior to install carpets
- Select tile — 60 days prior to install counters
- Select exterior colors* — Prior to enclosure paint
- Select interior colors* — Prior to interior paint body
* Note: If stains are to be used, insist that a sample be prepared using actual material from your job.
Costs and Cost Factors
A problem every builder faces is how to answer the question “How much does it cost to build a house?” Clients expect some type of answer, even though there may be no finished plans, and there is little information available to the builder on which to base his reply. To fail to reply may be seen by a prospective client as evasive, while to give a value which turns out to be less than the firm bid is seen as “sand bagging”, and too high a number may be compared to another builder’s less conservative reply, and the client lost. As a result, nearly every contractor will attempt to give some type of an estimate, warning that his answer is just a rough, and a bid based on detailed drawings will be much more accurate
Builders usually respond to inquiry’s on preliminary building costs by giving a “Cost per Square Foot” answer. The first problem of such a reply is the question of what square footage are we talking about. Although it is generally assumed the contractor must mean the area enclosed within the walls of the structure, some builders quote a value based on the inhabitable area in the house, but include the garage in their costs. This of course yields a higher $/sq ft than if the garage was considered separately. Houses which have porches or decks also present a similar issue. As these features may cost as much per square foot as enclosed space, whether they in the footage or just in the cost must be known if you are trying to evaluate several $/sq ft quotes.
A second issue regarding $/sq ft data is what is included in the costs. Are permits, water and sewer systems, driveways and site clearing included or is it assumed these are to be provided to the builder by the owner?
Another consideration is the impact of house size on unit cost. As every home must have a bathroom and kitchen, and as these are the most expensive rooms in the house, the cost per sq ft of a small home may be greater than a larger one.
And lastly, there is the question of the price range of interior and exterior finishes and components. Wood windows, hardwood floors and tile counters cost considerably more than vinyl windows, carpets and Formica counters. What assumptions were made by the builder when he responded to your inquiry?
I generally reply to what I call a ROM (rough order of magnitude) request as follows:
Assumptions:
If lot is sloped greater than 1-2%, add 10%; if greater than 10%, add 20%
Water, sewer, electrical, telephone, and LP gas to be provided by owner
Permits, design and engineering costs to be paid directly by owner
Vinyl windows
Fiber cement panel siding
30 year asphalt shingle roofing
LP gas forced air furnace and water heater
Fiberglass tub shower units
Floor coverings at $22 per square yard
Factory built hardwood door cabinets
Formica counter tops
Basis of calculation:
Include any porches or decks in square footage
Provide separate $/sq ft value for garages
On the basis of the above assumptions and calculation criteria, I currently quote $150/sq ft for houses, $35/sq ft for attached garages and $45sq ft for detached garages. Actual experienced values for houses have ranged from $150 to 250 per sq ft when adjusted for current lumber prices. A review of prices for higher quality custom homes displayed in the trade magazines indicates a range of $200 to 400+.
I am often asked to explain how the basic configuration and selection of components of the home affects the construction costs. To respond, I have found, it is useful to describe a “least expensive” basic home and then explain the features which cause cost increases. A glossary of construction terms is provided at the end of this guide and may be useful to consult when reading the following material.
A square or rectangular floor plan, single story, with a small but functional kitchen, one bath room and an attached garage will be our start point. This home will be built on an insulated concrete slab, will have sheet cement board siding and a single ridge line roof covered with asphalt shingles. This is your typical tract “starter” home which provides basic shelter at the lowest possible price.
It is often stated that a two story home is less expensive than a comparable home built on one floor. I think the issue is somewhat more complicated then that. For example, the stairway requires approximately 100 square feet of floor space. Would a comparable single story home have 100 sq ft less floor area? Often, a two story home requires the addition of a bath room or half bath unless a comparable house means in one case you have to go up a flight of stairs every time you need to use a bath room. If our comparable single story is built on a slab floor while our two story requires a more expensive second floor structure, floor cost increases in the two story will offset some of the roof structure savings.
Regarding floor structures, my experience indicates that a “built up” floor, i.e. beams, floor joists and plywood cost $2500 to $3000 more than the same area (1500 to 1800 sq ft) done with an edge insulated slab. An insulated slab has foam insulation placed around the perimeter of the slab to reduce heat loss. Tests have proven that as much as 80% of the floor heat loss is to the air that is in contact with the exposed edges of the slab. Of course a slab floor requires a level pad and if extensive grading is required, the cost advantage can be reduced or eliminated.
Corners cost money! Additional foundation form labor, framing labor and materials, trim, and dry wall finishing increases cost when corners are added to our basic square or rectangle.
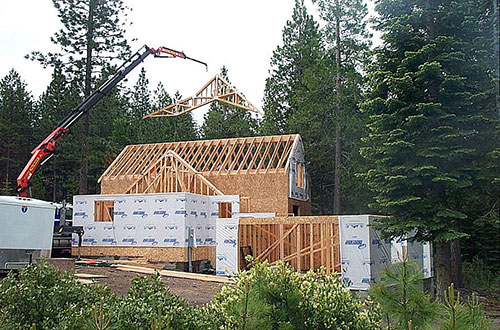
It seems that designers of today’s “Post Modern” homes are trying to out gable each other. I guess the guy with the most gables wins. Changes in roof ridges and gables add costs for labor, material and scrap. Site built roof support structures generally cost more than factory built trusses. This doesn’t imply that all ceilings must be flat, as scissors trusses can provide a vaulted ceiling for a small increase in cost.
Our basic house used sheet siding (4 ft by 8 ft for example) of fiber cement. Using horizontal lap siding of a comparably priced material adds cost due to the additional labor required for installation. Lap, vinyl, aluminum, and stucco also are more expensive as they require a plywood or stran board sheer panel to be installed under the finish siding.
To meet California’s Energy Code, our basic house would use vinyl windows glazed with double pane standard glass. Window costs increase, along with energy efficiency as follows:
Frames
Vinyl
Wood
Wood clad — Most expensive
Glass
Single pane — Cheapest, not allowed in residences in California
Double pane (At least one pane must be tempered per the new California Fire Marshall requirements)
Triple pane
Low E coating
Argon filled
Heat shield insert — Most expensive
As an example of the impact on project costs due to window selection, a recent home I completed had a difference of nearly $7000 between vinyl and wood framed windows with identical glazing. For anyone on a budget I recommend vinyl frames with dual pane glazing.
Finish roofing on our basic house is three tab, 30 year life, asphalt shingles. I recommend the use of at least 35 year shingles as a minimum, preferably 40 year. If severe weather conditions exist, for example high winds, a 40 year life product should be considered as the extra thickness provides additional wind damage resistance. Expensive wood shingles or shakes are to be avoided because of the fire danger. Although standing seam metal roofing is attractive on some home designs, I think low profile sheeting is more compatible with cabins, barns and other less formal structures. Metal roofing materials are more expensive than asphalt shingles but the installation labor can be less on simple roof shapes.
In recent years, steel insulated exterior doors have taken a major share of the market. Our basic house would use this product and there is little reason to change unless the front door is to be considered a statement. In that case you can upgrade all the way up to furniture grade doors that can cost as much as $2500 to $3000 instead of perhaps $300 for the metal door. Interior doors can range from $100 for a hollow core raised panel or slab door to $300 or more for solid wood raised panel doors.
Our entry level home would use factory built cabinetry which consists of particle board boxes and Formica-like surfaced doors and face frames. The upgrade path for cabinets would be to go to factory built cabinets with plywood boxes and hardwood doors and frames, then to custom built cabinets fabricated by a local cabinet shop, or for the ultimate, furniture grade cabinets built by a wood working artisan. The price ranges along this path are typically from $3000 to $20,000.
Tile work is not included in our basic home as fiberglass tub/shower units and Formica counters are used to minimize costs. Tile cost can vary tremendously based on what materials are selected and the complexity of the installation. A rough value to use when considering tile is $20/ sq ft for material and labor.
Most entry level homes have vinyl on the bath and kitchen floor and carpets in the remainder of the house. Like tile, floor coverings have a wide price range. I would hesitate to install carpet or vinyl that costs less than $20/ sq yd. Hardwood floors can run as high as $60 to $70/ sq yd.
Our baseline home would use LP gas furnace for heating. The upgrade path is first LP gas central forced air heating with refrigerated cooling or use of an electric heat pump to provide both heating and cooling. More exotic systems such as heat pumps which take heat out of the earth instead of the air, or oil fired hot water- forced air systems can also be considered. Zero clearance prefabricated fireplace inserts, wood stoves or pellet stoves will cost between $2000 and $3000 for the stove, ducting, hearth and other related items. Siskiyou County requires that a backup source of heat be available if a fireplace or wood stove is used.
As stated elsewhere, finish and trim detail can have a significant impact on cost. Examples would include porch and stairway detail, exterior trim and interior trim and/ or paneling. The options here are too diverse to detail but you must realize that the contractor’s bid will consider such items.
When completed plans and specifications are available a definite bid can be provided by a general contractor. It should be appreciated that bid preparation represents considerable effort on the part of the general and subcontractors. Every stick of wood, wire, pipe, window, door, roof shingle, can of paint, etc. should be counted and priced. It is unreasonable for a prospective owner to request bid preparation from a number of contractors when it is problematical whether the project is actually going to proceed. ROM numbers are usually accurate enough for the owner to determine if he can finance the project.
Upsetting to all contractors is “Chinese Bidding”, where the owner tells one contractor another contractor’s bid, and asks if he would like to change his bid to a lower number. My personal position is that I submit my bid, making my numbers as competitive as possible, and it is unchanged whether the owner decides to go out for an additional bid or whether another contractor submits a lower bid. To alter my bid, without requests for changes in the scope of work on the house, says that my first submittal had excessive profit, and raises the issue of my honesty.
Many owners simply request a total price bid number. I think this is a mistake. I recommend that the bid response include the cost breakdown in a form required by most lenders. This breakdown (see example) provides information that is useful in comparing bids as well as understanding what various parts of the project are costing you. The breakdown is also of value in any later discussions regarding builder claims of added scope which we will discuss in the following section. A word of warning, showing one contractor’s cost breakdown to another contractor is as unethical as “Chinese bidding, and is of little benefit to the owner. Contractors reluctance to provide the breakdown until they have been selected is usually because of their fear that their competitor may be shown the information. All bid responses should identify the allowances included in the bid. This is the only way the owner can compare the data. Knowing only the bottom line value is really not knowing anything.
A breakdown, by month, of actual disbursements during the course of construction will depend on a number of factors (for example, does the contract allow for up front purchase of framing materials to lock in the price in an up market?). A typical breakdown would be:
Month 1 — 5%
Month 2 — 15%
Month 3 — 25%
Month 4 — 20%
Month 5 — 15%
Month 6 — 10% (final inspection)
Month 7 — 10% (30 day retention)
I would recommend that an owner establish a contingency budget over and beyond the contract budget. This will allow the owner to make changes or additions to the scope of the project as the work proceeds. As an example, on a recent project the owner was not aware that a particular view was available until he was able to stand on the second floor of the structure. With funds from his contingency budget he was able to have us add a dormer and window to take advantage of the opportunity.
Changes and Problems
Regardless how well a project is defined before construction commences, some changes or problems will need to be addressed during the course of the job.. This is a reality of life that contains some possibility for conflict between owner and builder. If proper procedures and documentation are used, however, it should be possible to avoid problems, and proceed with the work at hand. A simple rule followed by the contractor can be very effective: Don’t change anything that is specified in the drawings and specifications unless you have a signed change order. Some requests made by the owner may be acceptable to the contractor at no additional cost, and some changes desired by the contractor may be acceptable to the owner without price adjustment. I think it wise to document these anyway.
My personal interpretation of contract law is that I am responsible for providing a structure and related equipment as specified in the drawings and specifications for the contract price. If I made a mistake in estimating, that is my problem (fixed price bids). It is customary, however, to allow a contractor to change his bid price at the time of issuing the contract if the contractor made an arithmetical error in his bid. Contract allowances as specified in the contract are handled as I described in the section , Types of Contracts. I document any allowance adjustments in a change order for record keeping purposes. I see no reason for a contractor to present a bill at the end of the job for “extras” that the owner was unaware existed. As described in the section, Information from your Builder, an updated project financial report should be issued after each approved change order, indicating the new adjusted contract value.
If the drawings/specifications were prepared by someone other than the contractor and it is determined that changes need to be made to be able to build the structure, the owner should reimburse any additional costs incurred by the contractor. In cases where a contract has been signed before the building inspection authority has issued a building permit, changes required by the inspection authority should also be handled by a change order.
An example of a typical change order is presented.
Mechanics Liens
California Constitution, Article XIV states: “Mechanics, materialmen, artisans, and laborers of every class shall have a lien upon the property upon which they have bestowed labor or furnished materials, for the value of such materials, the value of such labor done and materials furnished; and the Legislature shall provide by law, for speedy and efficient enforcement of such liens.” Individuals and companies that may claim liens do not have to had contact with the owner but can have a contract with an agent of the owner, I.e., the general contractor.
For lien rights to be established, a qualified entity must serve a Preliminary 20-day Notice to the owner, general contractor and lender. This notice must be served within 20 days from the time of first furnishing the materials or labor. Notices are usually sent by registered mail. Uninformed owners are often alarmed when a pre-lien notice is received as they may conclude that someone who should be paid has not been.The notice is for the purpose of establishing rights for a future action if the sender is not paid and is not an indication that the general contractor has failed to make payment. In many cases the notice is received before the party has sent an invoice to the contractor.
Upon completion of the job (usually final inspection by the city or county) the owner files a Notice of Completion form with the County Recorder’s Office. Subcontractors and suppliers have 30 days from recording to file any liens. The general contractor has 60 days in which to file a lien.
As illustrated by the consumer protection information included in the example contract, there is a concern is that the owner may release funds to the general contractor for the purpose of reimbursing a sub but the general fails to do so. The owner then is still responsible for payment of the sub because the general is the owner’s agent and therefore the owner is responsible for the general’s actions. This issue is most effectively handled by the details of the distribution of funds procedures as defined in the contract. The most common method is to have the owner or representative of the lender mail the general contractor’s checks directly to the subs and material suppliers. The contract found in this booklet contains distribution of funds procedures for owner financed projects which do not involve a lender.
Information from your Builder
I am often surprised that owners don’t expect more information from their builder. We have already discussed bid cost detail, contracts and change orders. I recommend that a general contractor also provide Project Financial Reports. The purpose of these reports is to keep track of the contract total value with change orders and the disbursements made by the owner with the remaining balance due. This type of information is something you could do yourself, however, it is valuable to know that your contractor knows the financial status. The two linked figures present summary financial data and an example of a typical invoice prepared by the general contractor for disbursement by the owner.
I encourage my clients to ask questions and raise issues as soon as they are identified. If changes need to be made or problems resolved it is always better to take action as soon as possible before more costs are incurred for something which must be changed. During certain portions of the work a weekly visit to the site will probably be frequent enough to catch anything that has gone awry. At other times daily reviews might be warranted.
After Final Inspection
Before a home can be occupied it must be inspected by the inspection authority, who determines if it meets the building code requirements for health and safety. It is permissible to have non health and safety related tasks not completed at the time of this inspection. The owner may decide to file the Notice of Completion at once or wait until any remaining items are completed. If the final Phase payment is released (excluding the 30 day retention amount), the owner should require the contractor to identify any incomplete work in writing and his planned schedule for completion. I recommend that the Notice of Completion be filed as soon as possible after final (occupancy) inspection to start the clock on any lien actions.
As described in the sample contract included in this booklet (Part 11 of the General Conditions),the general contractor and subcontractors guarantee their workmanship for a period of one year.Most contractors use the date of the final inspection as the start date. Material and equipment suppliers also have warranties and their terms should be provided in documentation left by the builder.
Financing
If the owner requires the project to be financed by a lender, two loans are involved. First, a short term construction loan will be used followed by a long term mortgage issued after final inspection. Often a local bank provides the short term funds and the mortgage is packaged for sale to “Fanny Mae” or other institution.
Owners may choose to use mortgage brokers who will arrange both loans. Large contractor/developers obtain construction loan commitments which are independent of the final buyer and therefore the buyer need only obtain long term financing.
Construction loans are generally issued for a period no longer than one year and are structured such that the borrower pays interest on the funds which have been distributed, not the entire loan amount. For a typical house project the owner will pay interest equal to approximately four months interest on the full loan amount.
As discussed in the section on Contracts, the lender will distribute the funds to the contractor either by invoice or phase. As previously stated the invoice distribution method is preferable as the contractor does not have to include interest expense in his bid for covering payments made between bank distributions.
Loan applications require the borrower to provide a set of drawings and specifications, the bid cost breakdown, and personal financial information for the borrower. It is often possible to obtain a preliminary qualification as to borrowing limits by submitting the financial data only. This can be valuable in establishing the project’s maximum cost and therefore the design and specification of the components in the home.
The lender will use a real estate appraiser to evaluate the proposed home. From my experience, the lender will use the lower of the appraiser’s number or the contractor’s bid when determining the loan amount.
The appraiser’s evaluation is based on his best estimate of the “fair market value” of the completed project which is the price that the home can be expected to sell for in a reasonable period of time. A difficult site or certain features which may be of import to the owner may increase the construction cost but not the “fair market value”. Therefore, the appraiser’s valuation is not confirmation of the fairness of the contractor’s bid, but is information for the lender to calculate the collateral value of the project.
A word of caution: During the “closing” process for the construction loan, the title company will inspect the property to determine that no recent work has been conducted which might have associated lien rights. For example, if the lot has recently been graded or a well installed, there is the possibility that someone has not been paid and is in a position to file a lien. I advise you not to do any work on the property that requires contracting with someone unless the work is done several months in advance of starting your loan application process. I also recommend that you inform the title company if anything has been done recently so that proper lien release forms may be obtained in advance of their inspection.
Glossary
Note to the reader: The terms included in this glossary are defined as used by the author in discussion with his clients. Other General Contractors may have a somewhat different meaning when using these terms.
Building Permit — Required by the County or City for construction of any structure larger than a dog house. Obtaining a permit assures: That the structure complies with the requirements of the applicable building codes thereby assuring the health and safety of the public; that the project complies with local ordinances and zoning requirements; and that applicable taxes (fees) are collected and adjustments made to property valuations for future taxing.
California Building Code — The code which defines the requirements for construction of safe private and public buildings in California.
Ceiling joists — Framing members which support the finish ceiling material (usually drywall). The bottom chord of trusses may serve as ceiling joists.
Cleanup — All activities associated with collection and disposition of construction scrap and waste material. Also includes general household cleaning required upon completion of construction.
Drywall — Gypsum wall board (sheet rock) used as a finish ceiling and wall material. Generally used on the interior, but under some conditions may be used on exterior surfaces such as porch ceilings. Usually applied by a Drywall Subcontractor.
Electrical — Installation of the electrical system components including the service panel, wiring, outlets, ventilating fans, light fixtures, smoke detectors, telephone wiring and outlets, and doorbell. Performed by the Electrical Subcontractor in two phases: rough wiring and installation of the service panel and outlet boxes; and finish installation of fixtures and outlets and termination’s in the service panel. Television wiring in the structure is provided by the cable television or satellite dish provider and is purchased directly by the home owner from the service provider. Home security systems are also purchased directly by the owner.
Exterior trim — Refers to all exterior treatment such as window and door trim, corner trim, facia and eave trim, porch railings and pickets and exterior stairs and steps.
Flat work — Slabs, driveways, sidewalks, and other similar concrete structures.
Floor joists — Horizontal members which extend across the exterior walls to support the floor. These may be two-by material or engineered truss joists which are wooden “I” beams. First floor joists are often supported mid span on posts and beams, while second floor joists may be supported by interior as well as exterior walls.
Footing — That portion of the foundation which lies horizontally below ground level and transmits the weight of the structure to the supporting soil.
Foundation bolts — “J” shaped bolts which are embedded into the concrete stem wall or slab to hold the mudsill to the foundation.
Foundation — The footing and stem wall assembly which supports the structure.
Framing — The erection of the shell of the building from the foundation up to the roof sheeting, including installation of windows and exterior doors. May also include siding and exterior trim. Usually performed by a Framing Subcontractor
.Housewrap — Tyvek or similar product applied to the exterior walls before siding to reduce air infiltration through the wall.
Inspections — The review of work accomplished made by the Inspector at various points during the construction activity. These inspection points are defined by the inspection form issued as part of the building permit.
Inspector — The County or City representative who is responsible for confirming that structures are built in compliance with the approved plans and the CaliforniaBuilding Code.
Insulation — Most often fiberglass rolls/batts, fiberglass blown – in fibers, or foam insulating board. Floors, walls, and vaulted ceilings are usually insulated with rolls/batts. Flat ceilings may use either rolls/batts or blown in fiberglass. InNorthern California foam board insulation use is generally limited to perimeter insulation of slab floors, however, in some parts of the country foam board is applied to walls under the siding material.
Interior trim — Refers to all interior trim treatment such as installation of interior doors, door and window trim, handrails, banisters, and pickets, closet shelves, mop boards, towel racks and mirrors etc.
Mechanical — Installation of the heating and air conditioning system including heat exchangers, ducts, fans, and related equipment. Performed by the HVAC Subcontractor in three phases: under floor ducting; wall and ceiling ducts; and installation of equipment, finish registers and filters. The HVAC Subcontractor may also be responsible for providing a fireplace insert, chimney ducts, or other heating devices or components.
Mudsill — The two-by board placed on top of the concrete stem wall or slab . Is either foundation grade redwood or pressure treated fir.
Plan Reviewer — The City or County representative who reviews plan submittals to determine compliance with local and CaliforniaBuilding Code requirements as a condition to issuance of a building permit.
Plates — The horizontal sticks which are attached to the end of the studs to form the walls. The top plate is doubled with the joints staggered to provide strength at the top of the wall.
Plumbing — Installation of the water, waste and gas systems within the house. Performed by a Plumbing Subcontractor in three phases: under floor piping; in-wall and through roof work; and finish installation of fixtures and equipment. The plumbing subcontract usually includes the water heater and garbage disposal and service connections for the dish washer and icemaker.
Pony wall — Usually short (less than 8 feet high) walls which extend from the top of the foundation stem wall to the first floor. Most often found on hill-side houses where the foundation stair steps down the slope.
Punch list — A list prepared near the end of a project which itemizes the remaining work to be completed.
Rafters — Framing members which directly support the roof sheeting material. Where trusses are used they provide the function as well as serving as ceiling joists.
Rebar — Steel rods which are placed in concrete work to provide additional strength and minimize cracking.
Roof sheeting — The plywood or tongue and groove planking which supports the finish roofing material (shingles, metal, etc.)
Siding — The final exterior layer of the walls. May be applied over a wall sheeting (plywood, stran board, etc.) or may serve as both the shear panel and finish surface such as “T1-11” plywood or wood composite panels.
Site work — Refers to clearing, rough grading, excavation, and finish grading of the building site, installation of electrical, telephone, cable television, water, sewer, and gas services to the building and may include driveways and roads.
Slab — A thin (4 to 6 inch) layer of concrete which serves as a floor for a house or garage. The perimeter of the slab or any area which will carry loads from the roof or other floors will bear on footings.
Stem wall — That portion of the foundation which rests on the footing and rises at least 6 inches above ground level. May be poured at the same time as the footing (supported by forms) or constructed of concrete blocks which are then filled with concrete.
Studs — The vertical sticks used in walls. Generally exterior walls use 2×6 studs, interior, 2×4 studs.
Subfloor — Most often 3/4 inch plywood applied over the floor joists. Has a tongue and groove joint at right angles to the joists. Carpeting and hardwood flooring is installed directly over the subfloor. Tile and vinyl require an additional layer to be added before the finish flooring.
Temp pole — A pole supporting an electrical meter, circuit breakers and outlets used to provide temporary electrical service during construction.
Trusses — Most commonly assembled from 2×4 and/or 2×6 fir using nailing plates, trusses allow larger distances to be spanned than common rafters. Engineered trusses are fabricated by specialty manufacturers and delivered to the site. Trusses of this type include: Common – Provides pitched roof, flat ceiling, loads go to exterior walls. Scissors – provides pitched roof, pitched ceiling, loads to exterior walls. Gable – Provides pitched roof, support for gable siding material.
Two-by — Framing lumber with a nominal thickness of 2 inches (actual thickness approximately 1 1/2 inches). For example 2×4, 2×6, 2×10 etc.
Vapor barrier — A thin plastic sheet applied under a slab or between the drywall and insulation to prevent moisture transfer.